Detailed Instructions On Use: Difference between revisions
No edit summary |
No edit summary |
||
| Line 5: | Line 5: | ||
== Overview of the vinyl cutter == | == Overview of the vinyl cutter == | ||
[[File:Vinyl Cutter Main Unit.jpeg|300px|thumb| | [[File:Vinyl Cutter Main Unit.jpeg|300px|thumb|left|]] | ||
To the left is an overview of the vinyl cutter, it lives in the craft area with it's grey cloth dust cover over it, it connects via USB to a computer running the relevant cutting software and is mains powered. | |||
The main parts of the cutter are: | The main parts of the cutter are: | ||
Revision as of 21:18, 8 July 2019
This page will show in detail how to use the vinyl cutter, from connecting it to a computer, checking the settings, loading vinyl, performing cuts, then weeding and making the finished layered vinyl graphics.
Overview of the vinyl cutter

To the left is an overview of the vinyl cutter, it lives in the craft area with it's grey cloth dust cover over it, it connects via USB to a computer running the relevant cutting software and is mains powered.
The main parts of the cutter are:
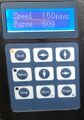
Control panel and display, used to set things up on the machine

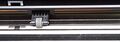
Knife / pen holder, holds the cutter and moves it along the Y axis, an electromagnet pulls the holder down onto the work
Metal rollers, and movable pinch rollers to grip the vinyl and move it along the X axis

The pinch rollers from the rear of the machine, the levers are to release them to load vinyl
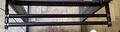
Rollers to hold the roll of vinyl, there are 2 spaces for the movable roller to accommodate different roll sizes
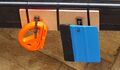
Tools to help with sign making : Orange thing is cuts the vinyl off the machine, blue is a squeegee to help lay the vinyl down


DELETE AFTER FINISH