Workshop/Bench Drill
Our pillar drill is an Axminster AT2001DP, it is on loan from Aidan. Do not drill the table.
- 2MT Taper Spindle, holding a 13 mm keyless chuck.
- 180-2740 RPM
A manual is available from Axminster.
Safety
This drill actually has a well thought out safety guard - please ensure you use it. The drill will not start unless the guard is in place around the chuck area. Releasing pressure periodically whilst drilling will prevent the production of dangerous long, stringy chips.
- Loose clothing and long hair MUST be tied back. Remove jewelery.
- You MUST NOT wear gloves, even latex/nitrile ones.
- Eye protection must be worn.
- You MUST NOT attempt to stop the spindle by hand.
- Secure work to the table using clamps or a vise.
- You MUST NOT attempt to use the drill as a mill - the taper holding the chuck will release and damage you or the machine.
- The drill bit and work might be hot after drilling - beware of burns.
- If you are using a keyed chuck, ensure the chuck key is removed before the spindle is started.
Keyless Chuck
The maximum capacity of the keyless chuck is 13 mm. Do not use a reduced-shank drill with a cutting diameter of greater than 13 mm - this could cause the chuck to over-tighten itself. Use the keyed 2MT chuck from the lathe, or a 2MT taper shank drill if you need to drill a larger hole.
Changing the spindle speed

It is important to change the spindle speed to suit the size of the drill and the material being drilled. There is a belt-speed chart on the inside of the pulley cover, this also has a quick reference for ideal speeds for a variety of different materials.
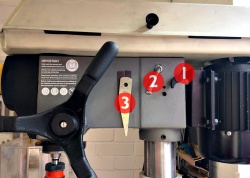
- Loosen the two butterfly thumb screws (1) either side of the drill body.
- Turn the chrome metal handle (2) on the right hand side of the drill body towards you to move the motor towards the drill and loosen the belts.
- Set the pulleys as appropriate.
- Push the chrome metal handle (2) away from you to push the motor out and tighten the belts.
- Tighten the two butterfly thumb screws (1) to hold the motor in place.
Releasing the chuck

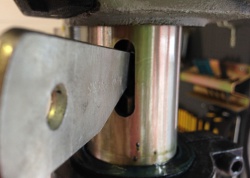
The chuck is released with the Morse Taper Drift, which is held to the side of the drill with magnetic tape.
Removing a chuck or morse taper shank tool
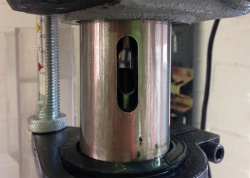
- Extend the spindle column of the drill press until the drift slot is visible.
- Rotate the chuck by hand until the inner slot on the spindle lines up the outer slot.
- Insert the drift into both slots.
- Gently raise the spindle column, taking care the chuck doesn't fall when it is released.
- Return the Drift to its magnetic home.

Inserting a chuck or morse taper shank tool
- Place a piece of wood onto the table
- Clean the spindle taper and the tool taper so that it is grease free
- Gently insert the tool into the spindle, rotating it so that the tang (if present) will fit into the slot.
- Gently but firmly press the tool or face of the chuck (with the jaws retracted fully into the body) into the wood on the table. This helps to seat the tapers together.