Detailed Instructions On Use
This page will show in detail how to use the vinyl cutter, from connecting it to a computer, checking the settings, loading vinyl, performing cuts, then weeding and making the finished layered vinyl graphics.
Overview of the vinyl cutter

Above is an overview of the vinyl cutter, it lives in the craft area with it's grey cloth dust cover over it, it connects via USB to a computer running the relevant cutting software, is mains powered, and is mounted on a wheeled stand for easily moving it to your desired workstation.
The main parts of the cutter are:
-
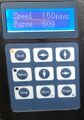 Control panel and display, used to set things up on the machine
 -
 Knife / pen holder, holds the cutter and moves it along the Y axis, an electromagnet pulls the holder down onto the work
 -
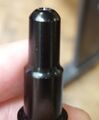 The blade, it's tiny and is adjusted to stick out just enough to cut only the vinyl and not right through to the backing paper, it is adjustable, but please don't adjust it without knowing you can re-set it
 -
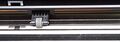 Metal rollers, and movable pinch rollers to grip the vinyl and move it along the X axis
 -
 The pinch rollers from the rear of the machine, the levers are to release them to load vinyl
 -
 Rollers to hold the roll of vinyl, there are 2 spaces for the movable roller to accommodate different roll sizes
 -
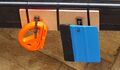 Tools to help with sign making : Orange thing is cuts the vinyl off the machine, blue is a squeegee to help lay the vinyl down


Software
You draw your design using a vector drawing program, then the file is sent to the vinyl cutter using an ancient but still valid format known as HPGL (Hewlett-Packard Graphics Language) the file is sent in chunks rather than all at once, so it's recommended you do not adjust settings on the control panel of the cutter whilst it is cutting, as this can sometimes result in corrupted data and you get random lines cut on your design.
You can draw your design in Inkscape, and send it to the vinyl cutter using a plugin called Inkcut i believe (someone who has done this will hopefully add to this page)
I personally use a program called "Sign Blazer Elements" this is a program written just for creating vinyl graphics and has some handy features like raster graphical format to vector format scanning, tons of fonts, corporate logo's, sign elements (like road signs, exit signs etc) and a lot more. The bloke who wrote it died some years ago so there will never be any updates, but it does more than I've ever needed to do when making vinyl graphics (I've owned a vinyl cutter for personal use since about 2004)
A very popular vinyl cutter manufacturer keeps a version of it free for anyone to download and use, including their extensive drivers for most vinyl cutters out there, The following link is a direct download link for windows. US Cutters Sign Blazer Elements .exe
A good little program to use with this is called 'Windows Enabler' (google will find that) When windows enabler is turned on all greyed out menu items are made active, thus when used with Sign Blazer Elements the result is full program features becoming available, these are just suggestions, use at your own risk of course.
THIS PAGE IS STILL BEING CREATED, AND WILL BE UPDATED WITH LOTS MORE INFO INCLUDING STEP BY STEP WITH PICTURES ON HOW TO MAKE A 3 LAYER VINYL GRAPHIC.
DELETE AFTER FINISH